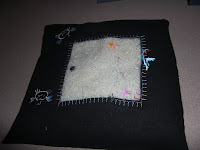
I made an I spy bag for my son several months ago and he loves it! It is great for church, the car, air planes, the doctors office, or any time you need your child to sit still for a little while. And, they make a perfect stocking stuffer. Since they are so fun and versatile, I've decided to make a tutorial.
Description: an I spy bag that is 8" X 8" with a 3.5" X 3.5" window.
Materials needed:
Fabric rectangle 8.5" X 16.5"
Clear vinyl (heavy weight) square 5" X 5"
Approximately 4-5 cups of dry rice
Small 'I spy' items
Thread
Directions:
1. Cut a piece of fabric 8.5" X 16.5"
2. 2.5" down from one end of the rectangle and 2.5" in from each side, cut a square that is 3.5" X 3.5"
3. Cut a square piece of heavy weight vinyl 5" X 5".
Tip: make sure to use the heaviest weight of vinyl you can find. If you use lightweight your sewing will tear it and the items could also cut it.

4. Place the square vinyl on the wrong side of the fabric centering it over the square whole you cut. Use masking tape to secure a couple of the corners to keep the vinyl from sliding.

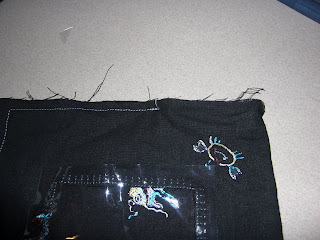
5. Use a blanket stitch from the right side of the fabric to sew the vinyl into place. It's fun to do a contrasting color that makes the peek hole stand out.

6. With right sides together, fold your rectangle in half 'hamburger' style. You will have 3 raw edges. Sew around these 3 edges leaving a 4 or 5 inch gap. Turn the bag right side out.
I have plans to make a little laminated label with each of the items listed on it. That's in the works. I'm going to attach it with a ribbon and sew that on to a corner.


Great project!! These would be so cool to include in the quiet bags we have at church.
ReplyDeleteI posted a link to your tutorial on Craft Gossip Sewing:
http://sewing.craftgossip.com/tutorial-i-spy-bag-for-quiet-play/2009/11/10/
--Anne
Thanks for the tutorial. Could you please explain folding something "hamburger style"?
ReplyDeleteBy "hamburger style" I just mean folding it in half so that the two ends are on top of each other instead of having the sides on top of each other. Does that help clarify?
ReplyDeleteI love this idea! I think I'll be making at least 5 of these for Christmas gifts.
ReplyDeletevery nice! Is there a machine stitch you could recommend for attaching the "window"? I'm making 8 of these, and my hand-sewing fingers are nearly dead from my Penny's Hands Hexie Caddy projects (5 of those!)
ReplyDeleteThanks, Jenn for the help! I gave you a bit of a shout-out over on my blog!
ReplyDeletehttp://mac-aroni-n-cheese.blogspot.com/2010/12/another-craft-i-spy-bags.html
Hello There. I found your blog using msn. This is a really well
ReplyDeletewritten article. I will be sure to bookmark it and return to read more of your useful info.
Thanks for the post. I'll definitely comeback.
Here is my weblog ... life like dolls
Excellent blog right here! Also your web site lots up very fast!
ReplyDeleteWhat web host are you the use of? Can I am getting your affiliate hyperlink in your host?
I wish my site loaded up as quickly as yours lol
Also visit my web blog sci-fi book blog
Pretty great post. I simply stumbled upon your weblog and wanted to say
ReplyDeletethat I have truly enjoyed browsing your blog posts.
After all I'll be subscribing on your rss feed and I hope you write again soon!
Stop by my page : Coupon Codes